Sunday, January 29, 2012

A Vintage Wicker Rocker!

This is a fabulous vintage rocker with bones I found last summer at the end of a driveway tag sale.  I circled and walked away due to the price but that rocker was on my mind all evening and the next morning I headed back to the sale and nabbed it at half price!
The gal that sold it knew what she had and simply never got around to the redo. She admitted I was the only person to show true appreciation yesterday and that was why she let me have it for less in the morning.  
Check out the very old fabric on the floor of the seat.  This has to be from about the 1890's!  The first thing I did was put on a mask and gloves and pulled off all the very old fabric and inner stuffing fibre; un-processed cotton batting; dried hay and horse tail (anyway, I hope it was horse tail!).
I did not photograph the process of tear down....

 Pulling out the teeny tiny nails was not easy!  I used a very small flat screw driver to pull up the little nail heads and pliers to pull them out.  It took me about 6-7 hours over 3 days (because it is hard on the hands) to get as many out as I could get to.  I did not save the nails but now realize those are a 'vintage' item, too (but, I mangled many of them so, oh well)!

 The next step was to restring the springs.  Maybe I'll photograph that 'how-to' on a future piece (I have now done it three times).
I updated the method and used plastic zip-ties instead of string and will confess here that form worked well here and I am likely to do that from here on out!

This project is NOT finished and I need to find just the right fabrics for the cushions and promise to update as that happens this spring! 

Saturday, January 7, 2012

Little table with wings...

When you land a fabulous find it can be a bit scary to just get going.  Using caustic materials can be intimidating but if you use the right protection and ventilation you'll be fine! 

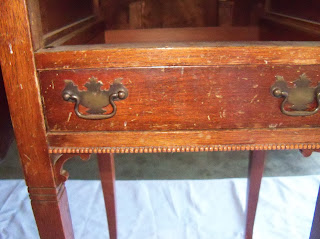
I found this little table at a yard sale for $6; it really had seen a better day. But as they say, 'it had bones' and cute hardware.

I had no plan in place but knew I needed to strip the little table of its remaining varnish.

Supply list: Use the right product (if you are stripping a piece of painted furniture use lacquer remover, etc) I purchased: 'varnish remover' (ACE Hardware, about $10); a heavy duty pair of rubber gloves; steel wool.  

You can buy a plastic scraper but I just cut the lid from a margarine tub in half so I had two 1/2 circle scrapers.  remove the hardware and USE YOUR EYE PROTECTION because you could accidentally flip a bit into your eyes and that would not be pleasant.

Follow the instructions on the can of varnish remover and be sure you are away from an ignitable source (furnace pilot light) and that the windows and doors are open!

Once your surface starts to bubble just start scraping it off.  Do NOT use anything metal as a scraper but you can use a tooth brush to get into small grooves and the steel wool to really grab the hard to get to areas. 
I used the margarine tub to scrape the gunk into it

 I then gave it a very easy sanding with a fine sand paper and then got a bee in my bonnet and instead of re-varnishing it I sprayed it with a can of 'almond' spray paint and hand painted the little bead trim with my current fave accent color (aqua).  After a few days dry time put the hardware back on and..

here's how it looks today...
 
I've decided this little table may still be a work in progress because of the almond color I think it looks a little 70's-ish.  I am not quite ready to do another step but it is likely to be a distress hit on it by sanding around the edges, etc...but that can wait.

Friday, January 6, 2012

Birds Nest Teapots

I have a rather large collection of vintage linen 'calendar tea towels'.  They are always showing up in one place or another around my home.  This past Christmas I used my feather birds as the theme in my dining room and worked in some of the tea towels...can you see where I used them?
I centered the tables with Birds Nest Teapots (actually 2 teapots, 2 coffee pots and 1 chocolate pot)...do you see the tea towels yet?


No more guessing...this shows the materials used for the centerpieces. The tea towel was rolled up on the diagonal and wrapped around itself to become a nest which I set on top of moss.  This one got 2 small egg shaped soaps and a ribbon and all were finished with a branch of wired bead and crystal sparkle that acted as steam coming out the spout.

 Some of the other pots lids have Christmas embellishments that can be swapped for another season...

...this one will stay out through Spring...

2012- To put it simply: time to get started.

At some point I guess I have to listen.  Friends compliment me on the way I make stuff...I suppose it's called 'style'.  Of course, everyone has style but this is just the place I'll share inspirations that get me going along in my Rainheart Daze way and most of what I place here I expect will fall into the DIY category. 

This will evolve but at the outset I want to share things I've made because making pretty things is very satisfying.  Finishing a project, even more so! And hey, if I blog about it, it may hold me to the fire!

Cheers to using lessons of the past to avoid as many creating mistakes as possible; clearing away rain clouds and distractions and finishing at least 1 ambitious project a month!